3. Version control for managing a user library
3.1. Introduction
This tutorial introduces best practices for collaborative development when managing a shared user library in IPKISS. We will explore version control systems (VCS) to illustrate how to manage changes and synchronize work within a team.
3.2. Git as a distributed version control system
Sharing code via zip files or shared network drives often leads to “file collisions” where one designer’s changes overwrite another’s. In order to avoid such problems, we recommend design teams to use a version control system (VCS). A good VCS lets you make changes with confidence because it guarantees that everyone is always up-to-date and allows you to revert to a previous version in case something goes wrong.
There are many different options, and we recommend designers to find out which one best fits their needs. Some popular examples are Git, Mercurial, Apache Subversion (SVN), and Perforce. This tutorial will focus on Git, a Distributed Version Control System (DVCS). Because Git is distributed, every designer has a full copy of the library’s history on their local machine. This allows for rapid development without needing a constant connection to a central server.
3.3. Basic concepts
Before diving into workflows, let’s cover some basic concepts. The team’s “Golden Source” library is stored in a central remote repository. This is a shared version of the library hosted on a service like GitHub, GitLab, or Bitbucket, which everyone on the team can access. Each designer has a local copy of this repository.
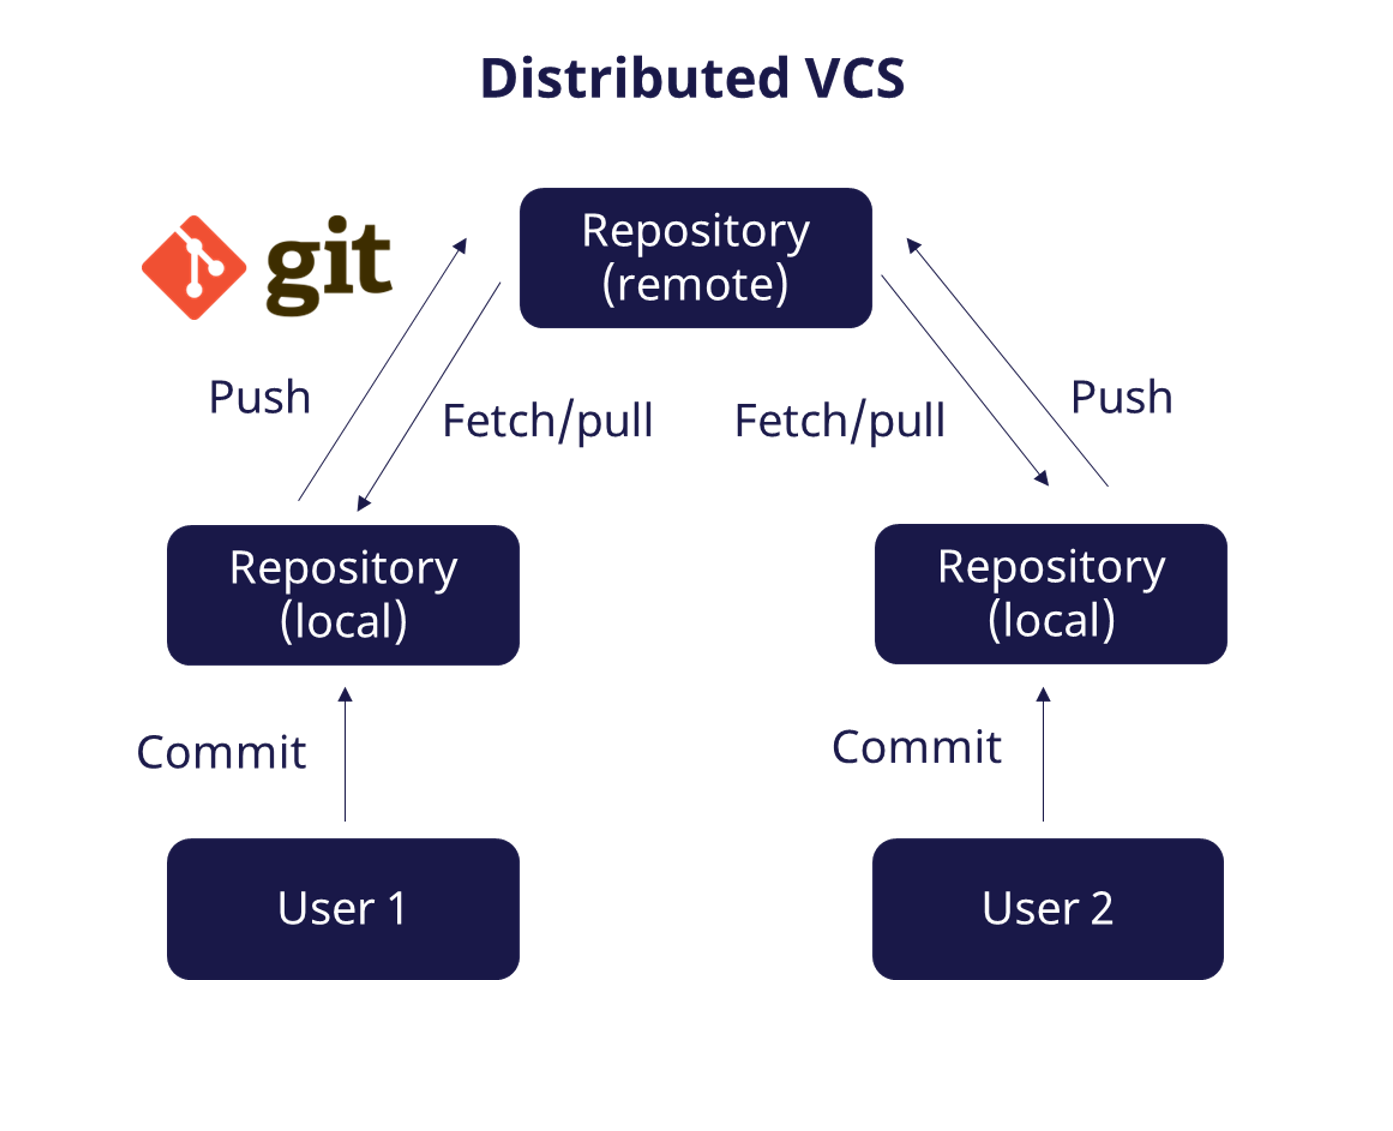
Git’s distributed architecture.
When you save changes in Git, you create a commit. A commit is a snapshot of your files at a specific point in time. Commits are saved in your local repository. To share your committed changes with your team, you push them to the remote repository. To retrieve the latest changes from others without integrating them into your current work, you fetch them into your local repository. To also integrate these fetched changes into your local copy, you then pull them. It is important to enter a short descriptive commit message so you and your team understand what has changed.
Undoing Changes: Because you’re now consistently keeping track of your work, it’s easy to view or revert to previous commits. There are a few different ways to undo changes in Git:
Revert commit: The safest option. Produces a new commit that reverts the changes in the original commit.
Undo commit: Undoes the last commit but keeps the changes in your local files.
Drop commit: Removes a commit and its changes. This can rewrite the commit history and should be used with care.
Note
Ignoring Files (`.gitignore`)
It’s often not necessary to track the changes of every file in a project. To tell Git not to track these files, you can add a .gitignore file to your project. In this file, you can specify file paths, extensions, or directories to ignore.
3.4. Scalable Workflow
The complexity of your VCS workflow can be adapted to your team’s needs. You can start with a simple workflow and add more layers of control and collaboration as your team and project grow.
3.4.1. Level 1: Committing on the Main Branch
The simplest workflow, ideal for very small teams, involves all designers working directly on the “main” branch. As depicted in the figure below, when a designer makes a change, they create a Commit in their local repository, then push it to the remote main branch. Everyone on the team can then pull these changes to their local copy. This works well when all team members are aware of each other’s work, but can become chaotic as the team and project grow.
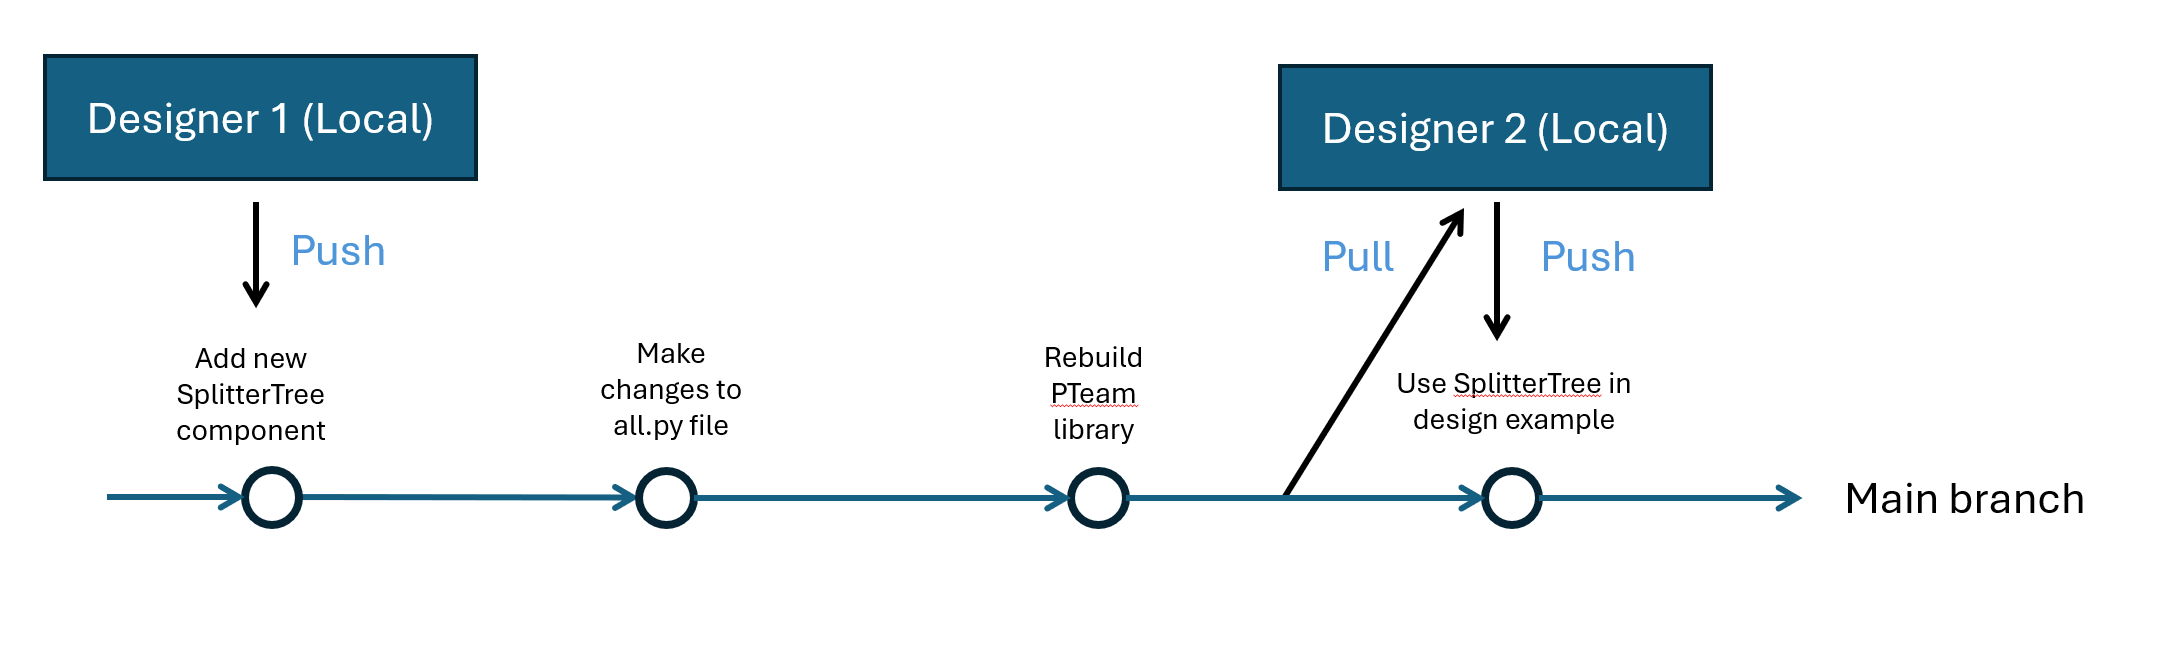
Level 1 workflow: Direct commits to the main branch.
3.4.2. Level 2: Using Branches for Safe Collaboration
Committing directly to the main branch (as described in Level 1) is risky in a team setting. If two designers are working on related components, their changes could conflict and break the library for everyone. To solve this, collaborative workflows rely on branches.
To work on a new component or a bug fix without disrupting the stable main branch, each designer creates a separate branch. As illustrated in the figure below, a branch allows for an independent line of development where you can safely make commits without affecting anyone else’s work on the main branch.
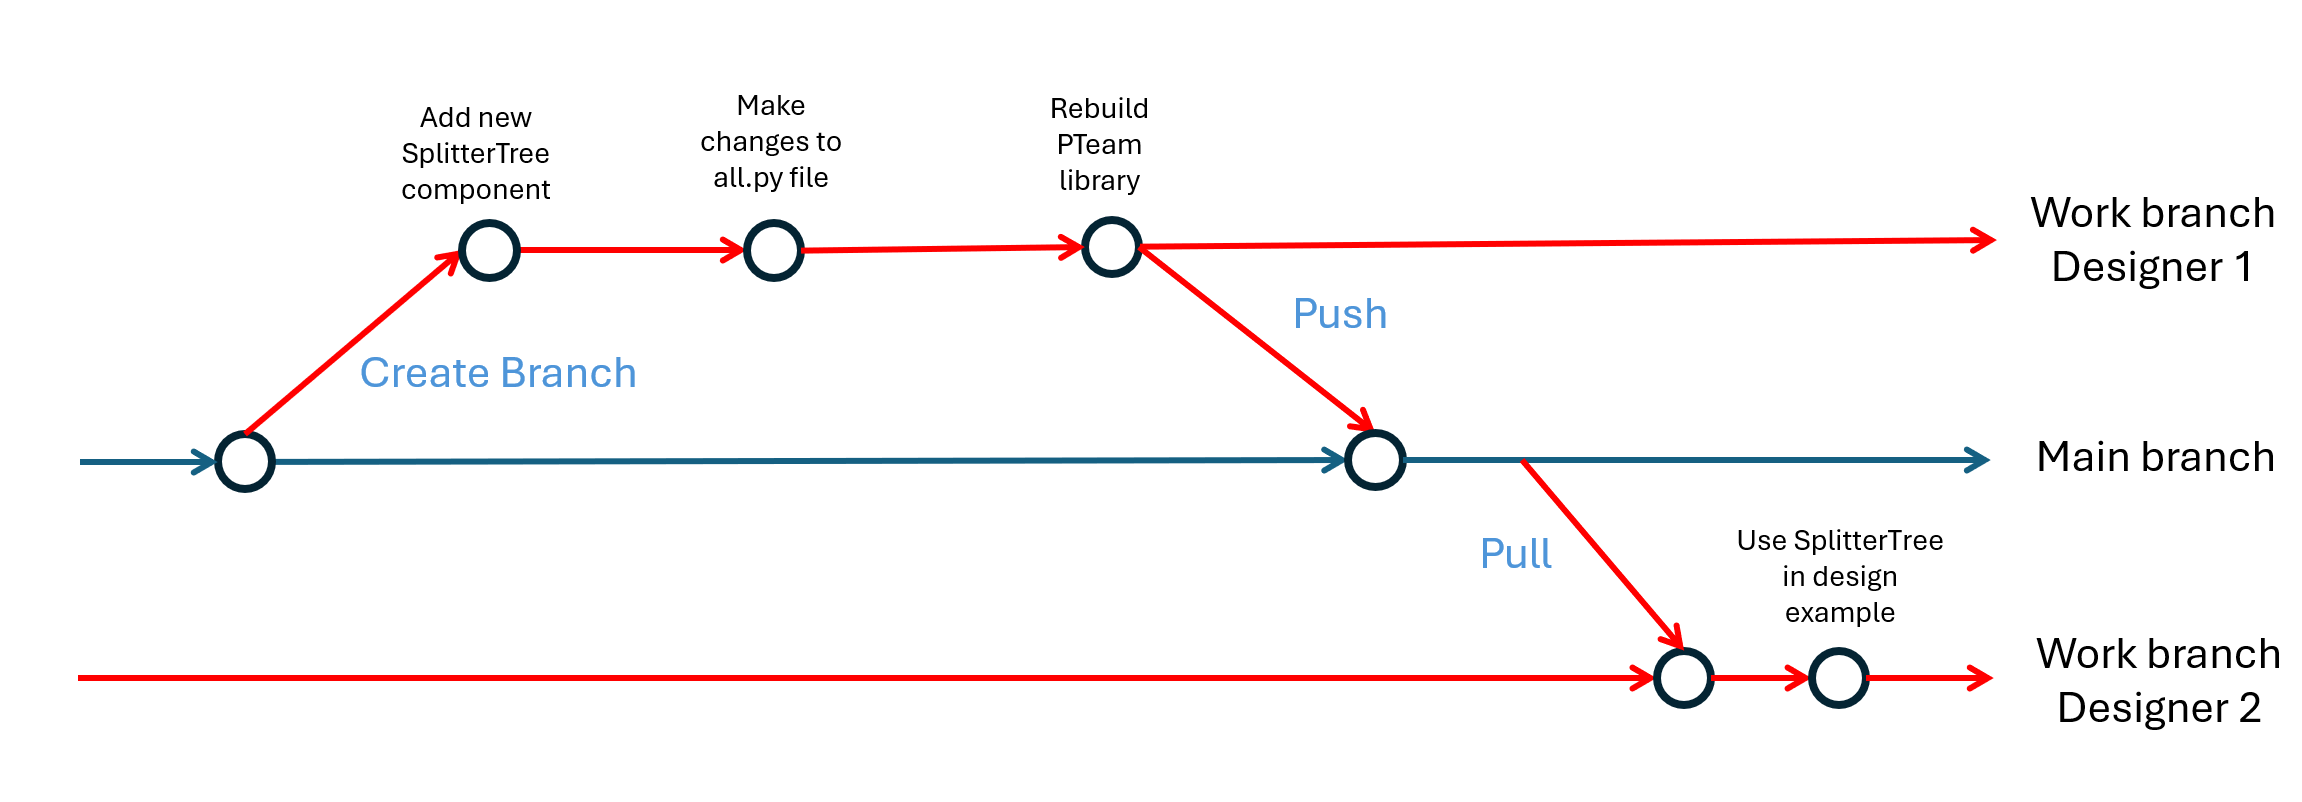
Level 2 workflow: Branch-based development.
The workflow, often visualized as parallel lines of development, is as follows:
A designer creates a new branch from the main branch, effectively branching off the main timeline.
They develop their new component, making isolated commits on this dedicated branch.
Once the work is complete and tested, they merge their branch back into the main branch, integrating their changes.
Other team members can then pull the updated main branch to synchronize their local versions with the newly integrated changes.
This approach isolates work-in-progress, preventing unstable code from entering the main library. It ensures the main branch always remains a reliable, working version of the “Golden Source,” which is crucial for team-based design.
3.4.3. Level 3: Code Review with Pull Requests
While merging branches directly (Level 2) works, it lacks a formal review step. To improve code quality and collaboration, platforms like GitHub introduce Pull Requests (PRs). A Pull Request is a formal way to propose changes and initiate a code review.
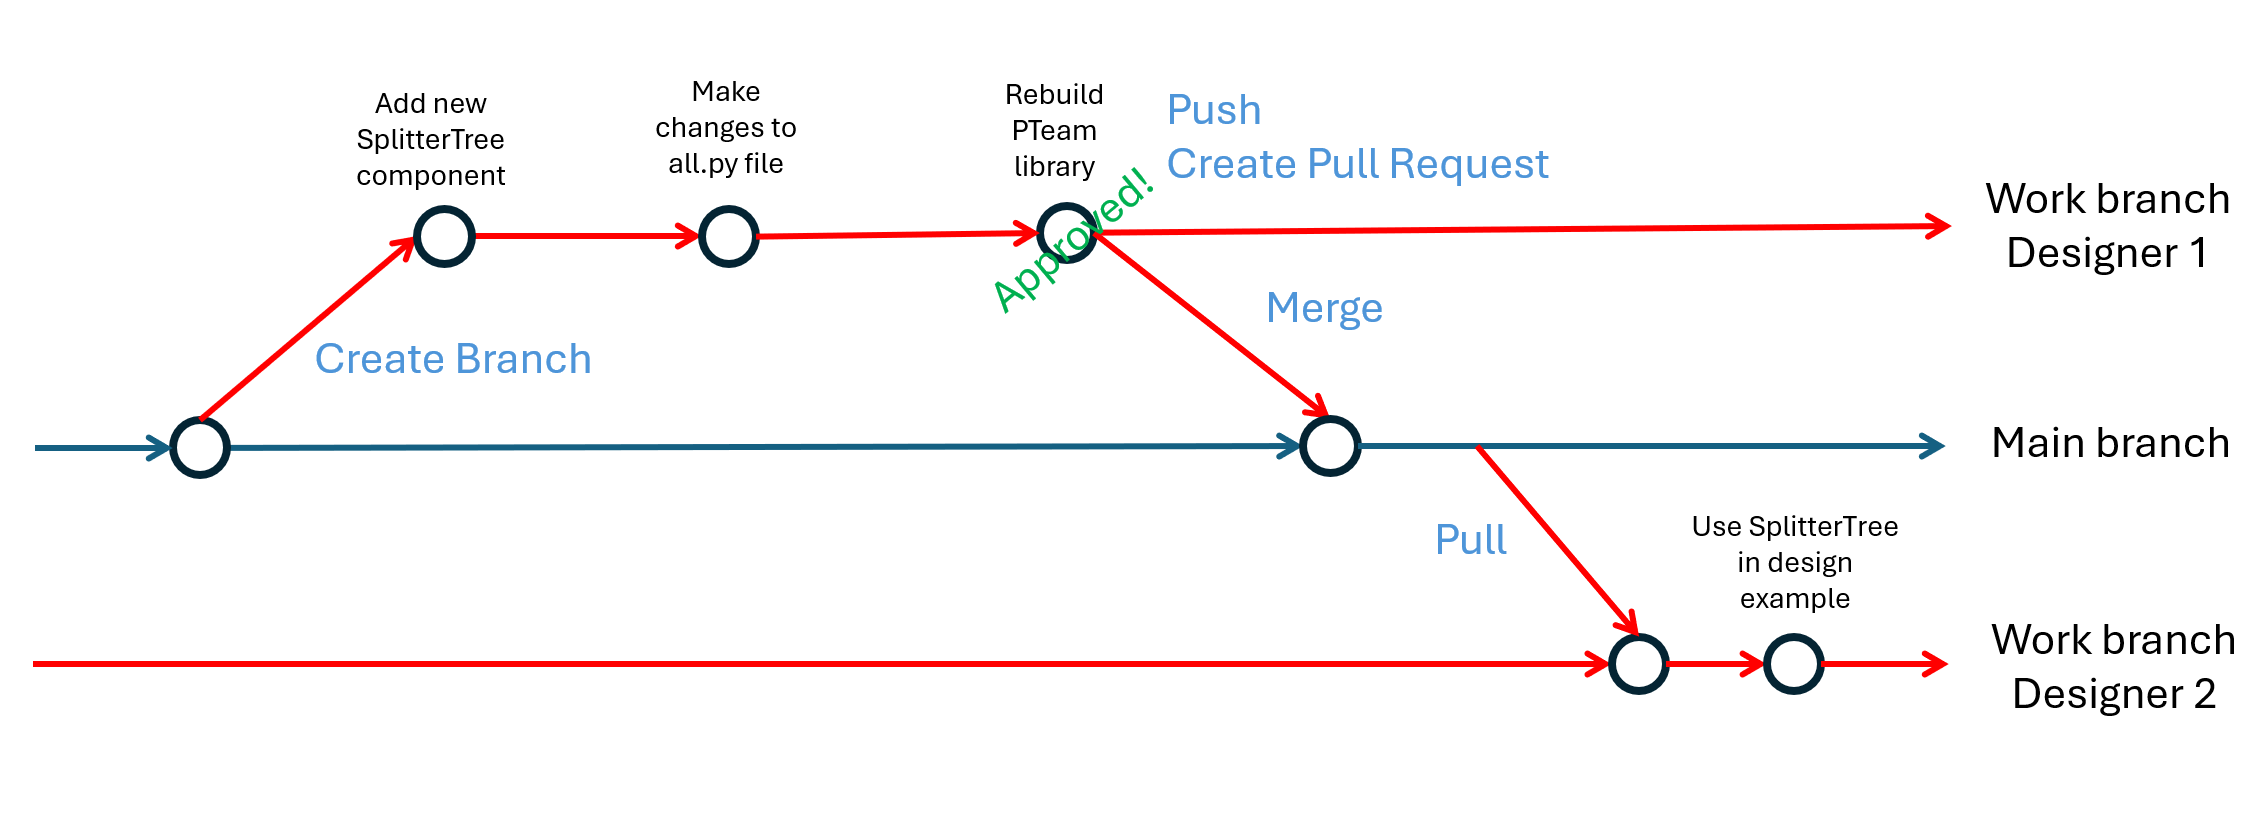
Level 3 workflow: Code review with Pull Requests.
As shown in the figure below, this workflow now includes a formal review stage:
Designer 1 creates a branch for their changes and pushes these commits to the remote repository.
Instead of directly merging, they open a Pull Request on platforms like GitHub, proposing their changes for integration.
This PR formally presents the changes, often visualized as a request to merge one branch into another, to the team for review.
Team members can then comment on the proposed code, ask questions, and request modifications directly within the Pull Request interface.
Once the code is reviewed and approved by the designated reviewers, the changes are safely merged into the main branch.
Other designers can then pull the updated main branch to synchronize their local versions, incorporating the newly reviewed and approved code.
This process ensures that at least one other person has reviewed the changes. It helps catch bugs early and maintains the high quality of the shared user library. Furthermore, automated tests can be integrated into the PR workflow to automatically verify code quality and functionality. For visualizing the Git flow and managing complex repository histories, we recommend using a graphical Git client like Fork.
3.5. Next Steps
There are many great tutorials to learn about your VCS of choice. For Git, the Git user manual provides a complete tutorial.
The following small tutorials provide step-by-step guides for getting started with VCS.
Using Git with PyCharm: Learn how to perform basic Git operations directly within the PyCharm IDE.
Using Fork as a Visual Git Client: A guide to using the Fork GUI for a more visual approach to Git.
Creating a Pull Request in GitHub: A detailed walkthrough of the code review process using GitHub Pull Requests.
3.6. Conclusion
You have now learned the fundamentals of using a version control system like Git to collaborate on a shared component library. By applying these branching and merging workflows, your team can avoid conflicts, track history, and build a reliable user library. In the next tutorial we will take a step further and see how we can implement regression tests inside your user library using an IPKISS IP manager license.