2. Building a user library
2.1. Introduction
Imagine a team of photonics designers. We’ll name them the P-Team. This team uses the SiFab PDK as a basis to design their components. Their goal is to build their own library, named the pteam_library_si_fab, consisting of their own custom components. By collaborating together on a shared library, the entire team is able to use and reuse everything in it.
This tutorial will guide you through creating your own custom user library, detailing its recommended folder structure, and demonstrating how to add new components to it.
2.2. What is a user library?
A user library acts as the Source of Truth for your team. It consists of validated PCells that rely on the foundry’s underlying technology and are used for your specific design projects. By using the same folder structure as a PDK you are able to internalize your own integrated photonics IP in the same way the foundry does.
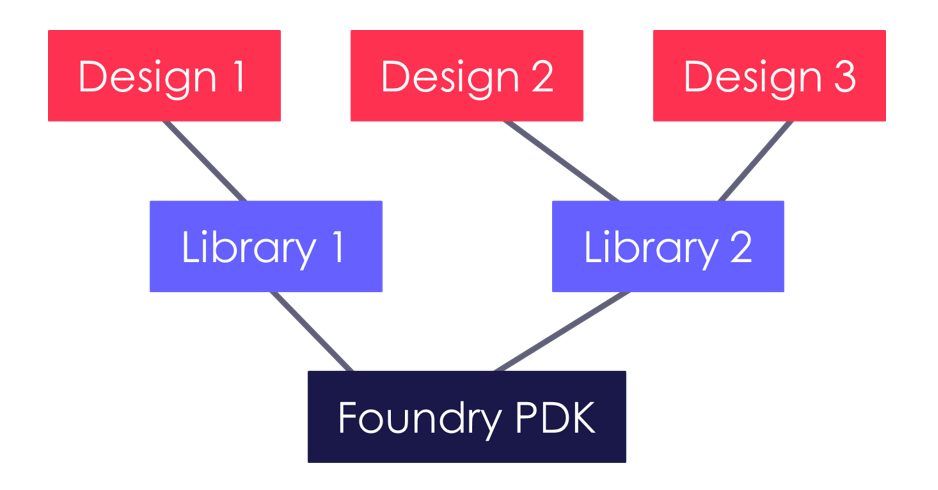
Hierarchy of Designs, Libraries, and PDKs
Having a well-maintained user library within your team offers the following advantages:
Design Consistency: By referencing a central library, you ensure that every designer is using the exact same version of a component.
Scalability and Maintenance: If a bug is identified in a library component, a single fix in the library repository propagates to every design that references it.
Abstraction: Libraries allow designers to focus on high-level circuit architecture without needing to see the underlying implementation code of every building block.
2.3. Folder structure
As mentioned before, the standard folder structure of a user library is very similar to a pdk structure. Let’s discuss the folder structure of the pteam library in more detail. You can find this library in luceda-academy/libraries/pteam_library_si_fab.
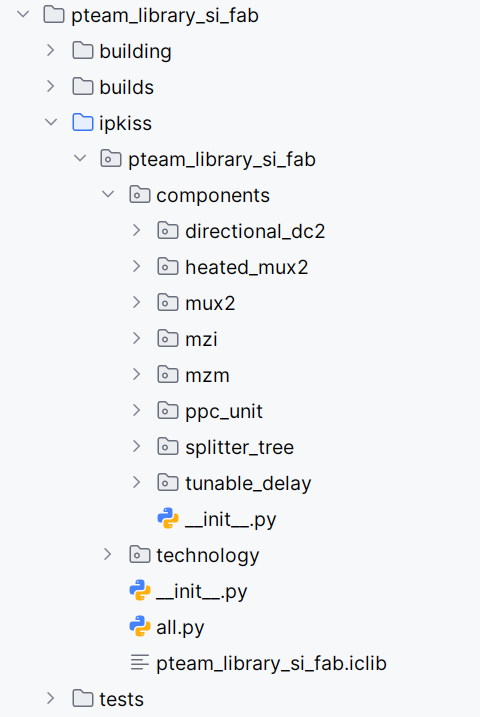
Structure of the pteam library
2.3.1. The building and builds folders
The building folder contains Python files used to build our library: build_iclib.py creates the iclib-file, which allows you to import your user library into CANVAS, and build_pteam_library_si_fab.py builds the IPKISS library.
The build folder contains the built IPKISS library and any possible library export formats (see Deploying Luceda libraries and PDKs in L-Edit).
2.3.2. The ipkiss folder
The ipkiss folder contains all the IPKISS-related files, structured as follows:
The components folder: This contains all the components based on the SiFab PDK, such as a simple splitter tree (
SplitterTree) and a more complicated heated two-way multiplexer (Mux2). We will explain this folder a bit more in detail below.The technology folder: This refers to the technology of the SiFab PDK. Since pteam_library_si_fab is a user library and does not define a technology of its own, it imports the technology from the si_fab library in the SiFab PDK. Inside the __init__.py file of the technology folder we import the technology.
# Note: this file may contain additional technology layers that are required for our small pcells library.
# Currently we need to specify this file and load TECH so the library builder knows how to build this library.

from si_fab import technology

TECH = technology.TECH
The splitter_tree folder under the components folder has a cell.py, an __init__.py in, and a doc folder with an example script example_splitter_tree.py .
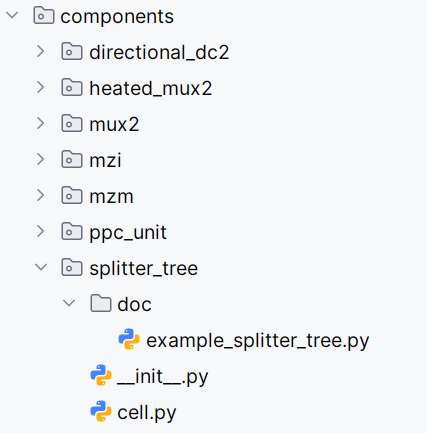
Folder structure of the splitter_tree component
cell.py contains the source code of the splitter tree PCell.
from si_fab import all as pdk

from ipkiss3 import all as i3


class SplitterTree(i3.Circuit):
    """This creates a splitter tree PCell, made of 1x2 splitter elements.

    Users can specify the number of tree levels as PCell parameter.
    """

    splitter = i3.ChildCellProperty(doc="Splitter used")
    levels = i3.IntProperty(default=3, doc="Number of levels")
    spacing_x = i3.PositiveNumberProperty(
        default=100.0, doc="Spacing between the splitters in x-direction in the last level"
    )
    spacing_y = i3.PositiveNumberProperty(default=50.0, doc="Spacing in y-direction")
    bend_radius = i3.PositiveNumberProperty()

    def _default_bend_radius(self):
        return 5.0

    def _default_splitter(self):
        return pdk.MMI1x2Optimized1550()

    def _default_specs(self):
        specs = [
            i3.Inst([f"sp_{level}_{sp}" for sp in range(int(2**level))], self.splitter) for level in range(self.levels)
        ]
        for level in range(self.levels):
            for sp in range(int(2**level)):
                sp_y = self.spacing_y * 2 ** (self.levels - level - 1)
                specs.append(
                    i3.Place(
                        f"sp_{level}_{sp}",
                        (level * self.spacing_x, -0.5 * (2**level - 1) * sp_y + sp * sp_y),
                    )
                )

        for level in range(1, self.levels):
            for sp in range(int(2**level)):
                if sp % 2 == 0:
                    in_port = f"sp_{level - 1}_{int(sp / 2.0)}:out1"
                else:
                    in_port = f"sp_{level - 1}_{int(sp / 2.0)}:out2"

                out_port = f"sp_{level}_{sp}:in1"

                specs.append(i3.ConnectManhattan(in_port, out_port, bend_radius=self.bend_radius))

        return specs
A more advanced tunable Mach Zehnder interferometer can be found in the heated_mux2 folder.
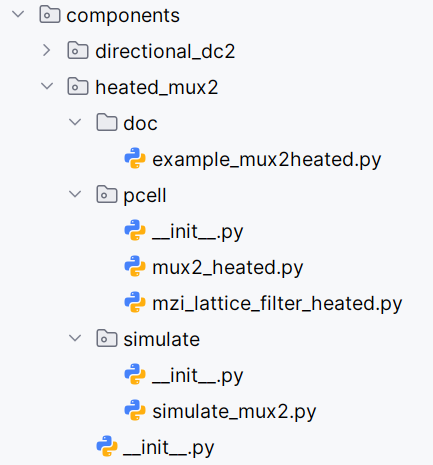
Folder structure of the heated_mux2 component
This folder also has a doc folder, containing a script example_mux2heated.py that visualizes the Mux2 and simulates it. The code defining the PCell itself can be found in mux2_heated.py inside the pcell folder. Then there is the simulate folder, which contains the simulation recipe for the Mux2 in simulate_mux2.py and an empty __init__.py. The presence of an __init__.py file within a directory tells Python that the directory should be treated as a package which facilitates the use of import statements.
In the all.py file all the components that are part of the custom library pteam_library_si_fab are imported.
from .components.mzi import MZI
from .components.heated_mux2 import Mux2Heated
from .components.splitter_tree import SplitterTree, RoutedSplitterTree
from .components.mzm import MZModulator
from .components.tunable_delay import TunableDelayLine
from .components.ppc_unit.pcell.cell import PPCUnit
from .components.mux2 import Mux2
from .components.directional_dc2 import DirectionalCouplerDC2

__all__ = [
    "MZI",
    "Mux2Heated",
    "SplitterTree",
    "RoutedSplitterTree",
    "MZModulator",
    "TunableDelayLine",
    "PPCUnit",
    "Mux2",
    "DirectionalCouplerDC2",
]
This makes it possible to import components from pteam_library_si_fab into other projects, using the import statement from pteam_library_si_fab.all import NameOfComponent.
2.3.3. The tests folder
This folder contains regression tests that can be executed using an IP manager license. More information about testing your component library can be found in the Test and validate your component library tutorial.
2.4. Add a component to a library
Adding a new building block to a library is created through a three-step process.
1. Create the User-Defined Component: The process begins with the creation of a new component in the components folder. We add the PCell source code and can also add a simulation recipe, an example and an init file.
2. Update the `all.py` file:
Once the component is defined, we need to be able to access it when importing the library.
We do this by updating the all.py file.
By adding an import statement—such as from .components.splitter_tree.cell import SplitterTree—you allow other designers to access the component via a simple, clean import statement in their own design scripts.
Don’t forget to add the component in the __all__ list as well.
3. Rebuild the Library: By running the build files we rebuild the ipkiss library, generate a new iclib file for Canvas export and build any selected library export formats (see Deploying Luceda libraries and PDKs in L-Edit).
2.5. Conclusion
In this tutorial, you have learned how to structure a custom user library and add new components. By applying these principles, your team can build a robust and scalable library of photonic components. To learn how to manage this library in a team environment, see the Version Control for Managing a User Library tutorial.